Is mastering the art of the pool table rack a puzzle you've been trying to solve? The perfect rack is the foundation of a winning game, yet it's a detail often overlooked, leading to frustrating breaks and missed opportunities.
The consistent, precise racking of pool balls is more than just a formality; it's a crucial skill that impacts the very fabric of your gameplay. A poorly racked set of balls can lead to a weak break, leaving you vulnerable to your opponent. Conversely, a well-structured rack sets the stage for a strategic and potentially decisive opening shot. This overlooked element is often the difference between a skilled player and a masterful one.
Unfortunately, a common frustration encountered by both novice and seasoned players alike is the persistent inability to find reliable information. Searches for "Correct way to rack a pool table" often yield disappointing results, with the internet offering a scattered collection of contradictory advice and poorly illustrated guides. Many query searches will end up showing the dreaded message: "We did not find results for: Correct way to rack a pool table. Check spelling or type a new query." The lack of a definitive, easily accessible resource on this seemingly simple task highlights a significant gap in the pool world's collective knowledge base. This article aims to bridge that gap. We will dissect the elements of a perfect rack, provide clear, actionable instructions, and offer strategies for achieving consistent results, transforming your break into a powerful offensive weapon.
Before we delve into the specifics of the perfect rack, let's acknowledge the ubiquitous challenge: the search for reliable information. It is a persistent struggle for pool players to find the resources they need, further complicating the process of improving their game. This is often compounded by the diverse range of equipment and playing conditions one might encounter. This can include everything from the size of the table to the condition of the cloth and the quality of the balls. Each of these variables can influence how the rack is performed. The following resources should help players of all levels to master the art of racking:
| Aspect | Details | Significance |
|---|---|---|
| The Rack Itself | Typically, a triangular rack is used for 8-ball and a diamond rack for 9-ball. Racks can be made from wood, plastic, or metal. They are designed to hold the balls in a compact formation. | The rack's condition and straightness are crucial. A warped or damaged rack can lead to an inconsistent and potentially illegal rack. A straight rack ensures the balls are tightly packed, transferring maximum energy on the break. |
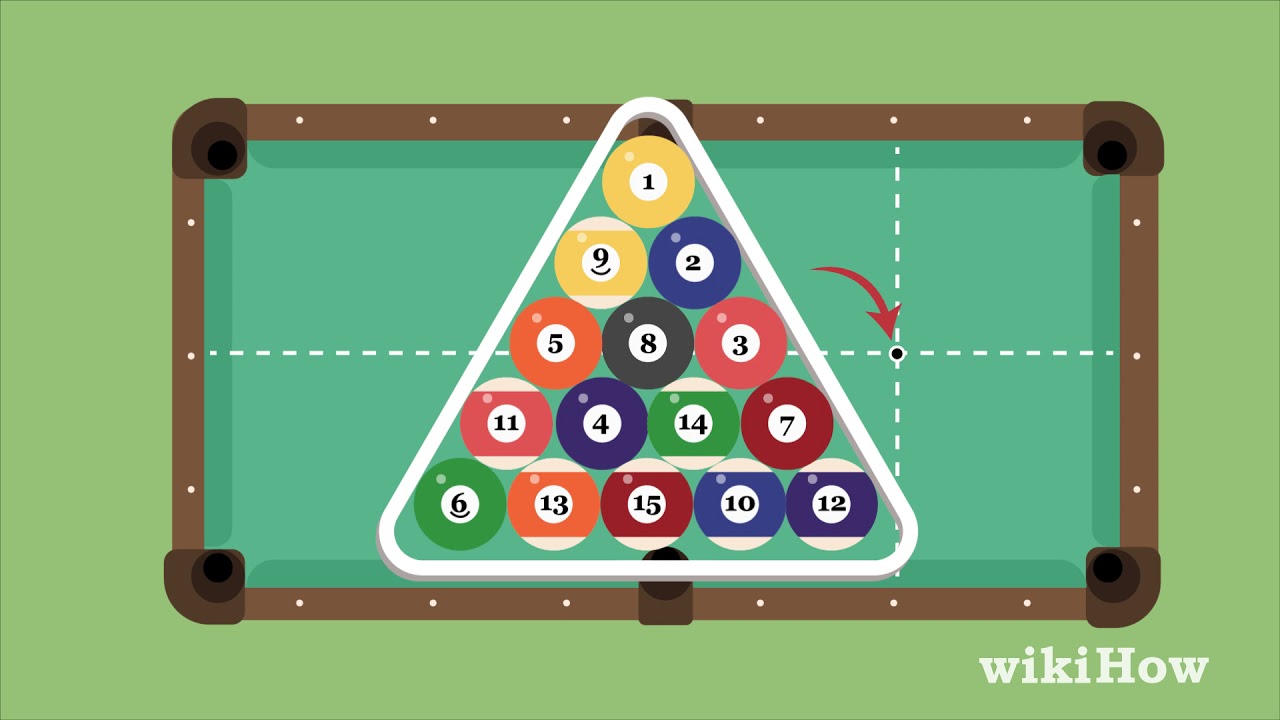
| Ball Placement (8-Ball) |
| This arrangement is designed to ensure a fair break, with a balance of solids and stripes potentially available. The 8-balls placement is designed to be a target, not to block the break shot, or to offer easy access for the opponent. |
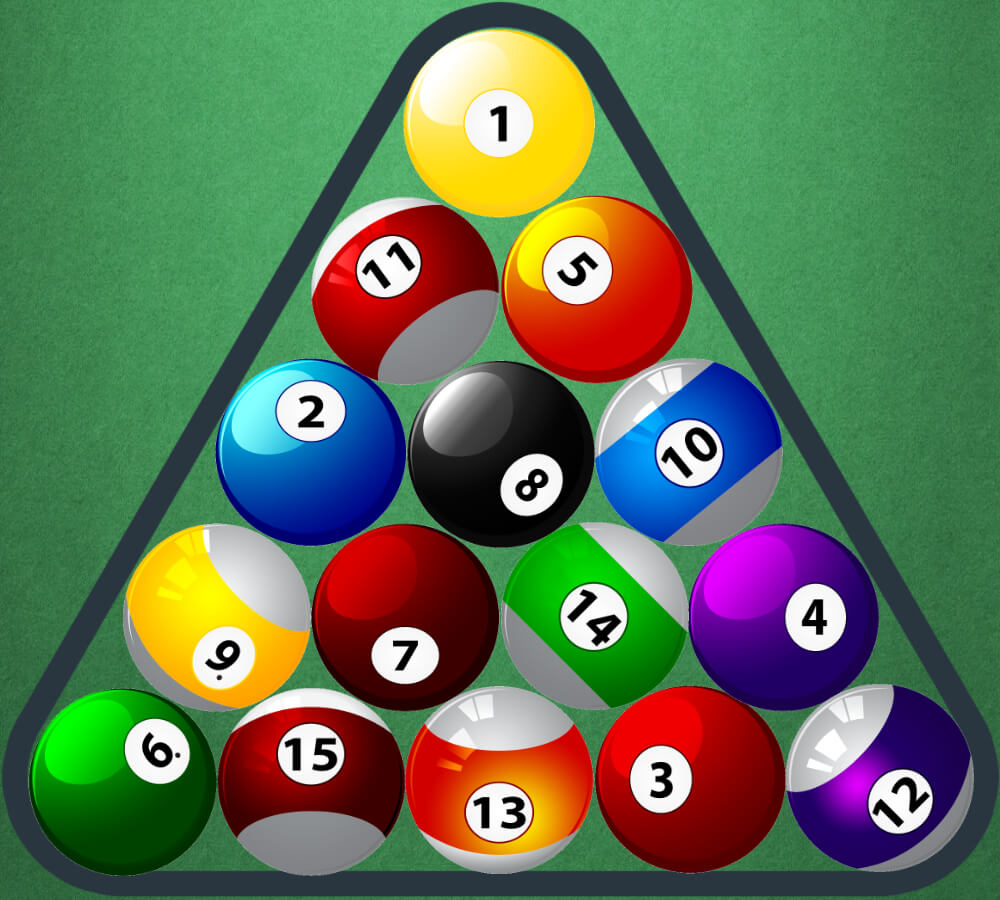
| Ball Placement (9-Ball) |
| This format allows for a strategic break, creating multiple potential shots on the break and establishing a pattern of play. The 1-ball is the primary target, while the 9-ball is positioned for safety and potential winning run outs. |
| Table Condition | The cloth should be clean and in good condition, without any tears, bumps, or excessive wear. The playing surface should be level. | A clean, level playing surface ensures the balls roll smoothly and accurately, which has a great impact on the rack. A surface in poor condition can lead to an unpredictable break. |
| Ball Condition | Balls should be clean and free of dirt, chalk, or any other debris. They should also be of equal size and weight. | Clean balls allow for a consistent break with predictable movement. Dirty or damaged balls can affect how they respond to contact and can cause unexpected deflections. |
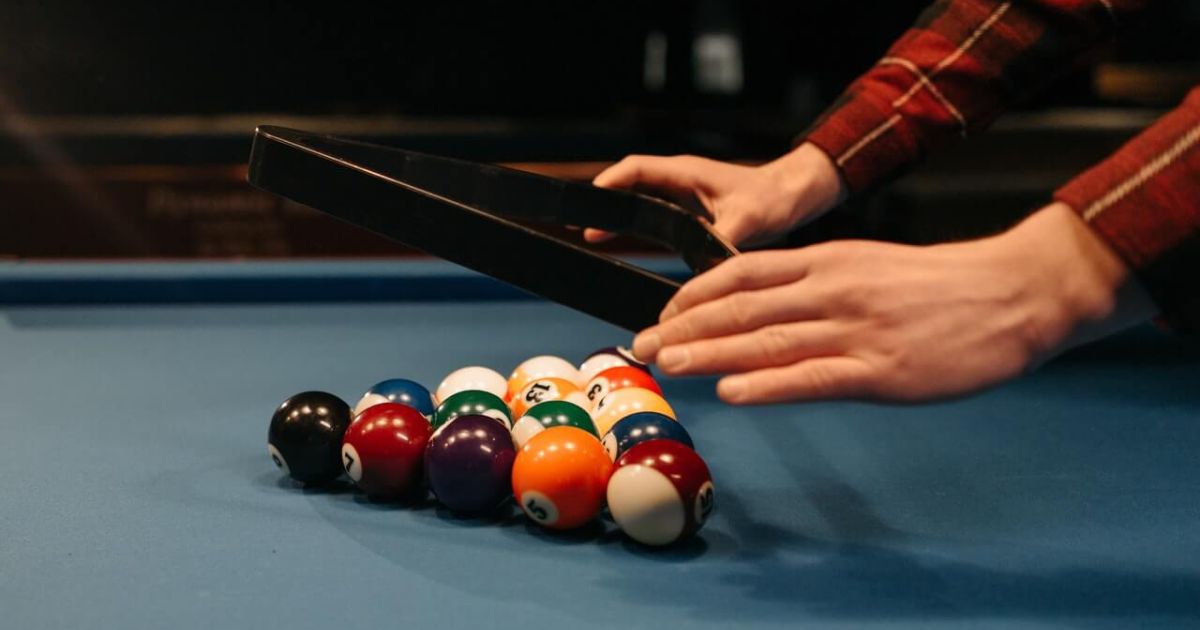
Now let's look at the specific process of racking pool balls. Remember, precision and consistency are the keys. Whether you are playing 8-ball, 9-ball, or any other variation, a well-executed rack significantly impacts your game. It is essential to build a strong foundation.
Step-by-Step Guide to Racking (8-Ball):
- Position the Rack: Place the triangular rack on the foot spot (the small dot on the table). Ensure the apex of the triangle (the point) is perfectly aligned with the foot spot.
- Place the 8-Ball: The 8-ball (black ball) goes in the center of the triangle. This is non-negotiable.
- Place the Corner Balls: Choose one solid and one striped ball for the back corners of the triangle. These balls must be placed on opposing corners, ensuring a balanced distribution of the sets of balls.
- Fill in the Remaining Balls: Randomly arrange the remaining balls within the rack, ensuring alternating solids and stripes around the corners. The balls should be tightly packed together.
- Final Check: Before removing the rack, ensure all the balls are touching and snugly against each other. This tight packing is critical for a powerful and effective break.
- Remove the Rack: Carefully remove the triangle. Do not disturb the formation of the balls.
Step-by-Step Guide to Racking (9-Ball):
- Position the Diamond Rack: Place the diamond rack on the foot spot of the table. Ensure the apex is facing toward the direction of the break.
- Place the 1-Ball: Place the 1-ball at the apex (front) of the diamond.
- Place the 9-Ball: Place the 9-ball in the center of the diamond.
- Fill in the Remaining Balls: Arrange the remaining balls randomly in the diamond, making sure they are touching each other tightly.
- Final Check: Ensure all balls are touching and are tightly packed against each other.
- Remove the Rack: Carefully remove the diamond rack without disturbing the ball arrangement.
These instructions provide a solid foundation, but the journey to perfect racking extends beyond these basics. Consider the following advanced techniques for maximizing consistency and power on the break:
| Technique | Details | Benefit |
|---|---|---|
| Using a Racking Template | A racking template is a thin plastic sheet that sits on the table surface. It has cut-outs that guide the placement of the balls. Place it on the table, arrange the balls into it, and carefully remove the template. | This method provides a level of precision. It helps to ensure the balls are perfectly aligned, reducing any gaps between balls. This will lead to a consistent break. |
| Applying Pressure | Use consistent pressure on the rack. Push the balls firmly, towards the rack. The goal is to achieve the tightest possible formation. | This ensures maximum energy transfer on the break shot. A tight rack will improve ball separation and control after the break. |
| The Chalk Test | Lightly chalk the balls or the table felt where the balls touch. Remove the rack and check for any gaps between balls. Use this method to identify areas needing additional pressure. | This allows players to visualize the contact points between the balls. It identifies gaps, helping in tightening the rack and promoting ball-to-ball energy transfer. |
| Table Adjustments | Ensure that the cloth is level and the table is leveled. Adjust the cloth and ball placement to create a consistent racking surface. | A level and consistent playing surface will minimize the impact on the break, creating the desired spin and contact on the balls, giving greater control over the break. |
| Practice and Experimentation | Experiment with your technique to find what works best. Practice the racking procedure to build muscle memory and consistently produce great results. | Practice is the key. By practicing the break and racking, players will develop an understanding of their best methods, thereby improving consistency and game performance. |
The ability to rack properly does not happen overnight. It requires practice, patience, and a dedication to the details. Incorporate these techniques into your routine, and you will find yourself consistently racking balls. These additional strategies ensure that your racking is consistently effective.
Beyond the fundamental mechanics and advanced techniques, there are subtle nuances and adjustments that can elevate your racking prowess. These refinements can be the difference between a decent break and a truly devastating one. Here's an additional table offering expert insights to refine your racking approach:
| Expert Insight | Description | Application |
|---|---|---|
| The "Tight-Pack" Mentality | This isn't just about visual alignment. It is about maximizing the pressure and ball contact within the rack. Think of it as a commitment to achieve a tight, almost locked-in configuration. | Focus on feeling the resistance of the balls against each other as you rack. Apply consistent, even pressure to ensure the balls are as tightly packed as possible. |
| The Apex Alignment | The apex ball's position (the front ball in 8-ball and the 1-ball in 9-ball) is critical. Ensure this ball is perfectly aligned with the tables foot spot. | Use the foot spot as a guide. Double-check the alignment before the break, as even slight deviations can alter the break. |
| The "Ghost Ball" Drill | Visualize an invisible "ghost ball" in contact with the apex ball. This mental image helps you center the cue ball for better break accuracy. | Before each break, visualize the ghost ball directly in line with the center of the apex ball and the cue ball. Adjust your stance and aim accordingly. |
| Cue Ball Placement and Break Angle | The position of the cue ball on the table for the break affects the shot. This can be further customized according to the goals. | Experiment with different cue ball positions. Try different break angles to control the cue ball after the break. |
| Table Conditions Awareness | Be aware of the tables unique characteristics, such as cloth condition, table size, or type of balls. | If necessary, adjust your racking technique to address any table anomalies. |
Ultimately, mastering the rack is an iterative process. It is an exercise of consistently seeking improvement. While the fundamental steps of racking may seem straightforward, the path to perfection requires dedication and attention. The seemingly simple act of racking pool balls is a process of skill, preparation, and an unwavering dedication to improvement. The journey begins by addressing the common challenges of the unknown. To truly master the art of racking, continuous practice is essential. It is an ongoing process of refinement. The path to perfection lies in the details, a commitment that separates good players from great players. The perfect rack is not a static skill; it is a dynamic process, a continuous journey of improvement that will revolutionize your game.
- July 11 Zodiac Sign Traits Compatibility And Astrological Insights
- Discover The Striking Resemblance Meet Janet Jacksons Son